


In this walkthrough, you learn how to create a card page to display customer details. A card page is used to display more detailed information than is available on a list page. You can link a list page to a card page so that when you select a customer in the list, you open a specific customer card page.
 About This Walkthrough
This walkthrough provides an overview of how to create a card page in Page Designer, how to add controls, and how to preview the page in the Microsoft Dynamics NAV Windows client.
This walkthrough illustrates the following tasks:
-
Creating a card page.
-
Adding controls.
-
Saving the page.
-
Promoting customer data to the FastTab header.
-
Running the page.
Prerequisites
To complete this walkthrough, you will need:
-
Microsoft Dynamics NAV 2015 installed with a developer license.
-
CRONUS International Ltd. demonstration database.
Story
Simon is a partner working for CRONUS International Ltd. Kevin, the Sales Manager, has asked Simon to create a card page to store customer information. He wants to be able to view the details of each customer in a card page when he chooses a customer in the customer list.
Creating a Card Page
To create a customer card page to run on the Microsoft Dynamics NAV Windows client, Simon knows that he must use the Microsoft Dynamics NAV Development Environment Object Designer.
 Note Note |
|---|
| In this walkthrough, to learn about the properties and controls of a card page you will create a card page from a blank page. Object Designer also includes a wizard that you can use to create a card page that sets up many properties and controls for you. For more information about the wizard, see How to: Create a Page. |
To create a card page
In Microsoft Dynamics NAV Development Environment, on the Tools menu, choose Object Designer.
In Object Designer, choose Page, and then choose New. The New Page window opens.
In the Table text box, choose the up arrow, select the Customer table, and then choose the OK button.
Choose Create blank page, and then choose the OK button.
The new page opens in Page Designer.
On the View menu, choose Properties.
In the PageType property, and set the Value column to Card.
Close the Properties window.
In Page Designer, in the first row, and in the Name column, enter CustomerCardContainer, and accept the default values for Type and Subtype fields.
You have now successfully created a card page. However, you cannot save your card page until you have added at least one control to your page.
Adding a Control to Display Customer Details
Simon wants to add a basic control to his card page to display a selection of fields from the customer table in a group that can be expanded or collapsed. He knows that all card pages use the FastTab control to display data in this way, so he decides to add a FastTab control to his blank card page.
To add a control to display customer details
In the second row, in the Name column, enter CustomerCardGroup, and in the Caption column, enter General. Set Type to Group and set SubType to Group.
In the third row, set Type to Field. On the View menu, choose Field Menu.
In the Field Menu window, select fields from the Customer table.
Select multiple fields by holding down the Ctrl key while you select the following rows:
-
No.
-
Name
-
Search Name
-
Name 2
-
Address
-
Address 2
-
City
-
Contact
-
Phone No.
-
No.
Choose the OK button. A message box appears with the following message: "Do you want to add the fields that are selected in the field menu?" Choose Yes.
If the OK and Cancel buttons are unavailable, see Page Designer Troubleshooting for more information.
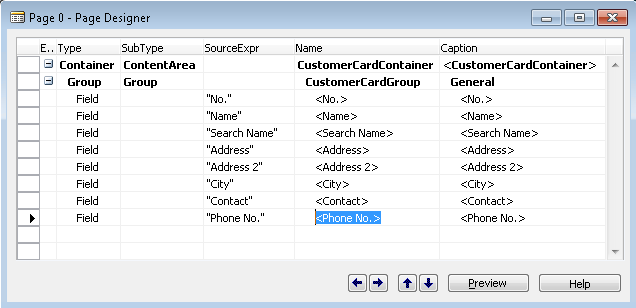
In Page Designer, your card page should now look something like the following illustration.
Select the next available blank row on your page, below Phone No., and on the View menu, choose Properties.
In the Properties window, in the Caption property, enter Kevin's Customer Card.
In the CaptionML property, accept the default value and close the Properties window.
Saving the Page
Simon thinks it would be a good idea to save the page before making any further changes.
To save the page
When you close Page Designer, the Save As dialog box is displayed.
In the ID field, enter 50002, and in the Name field, enter Kevin's Customer Card. For the ID, you can choose any number in the 50000 range.
Leave the Compiled check box selected and choose the OK button.
Note You can clear the Compiled check box to save your page, but your page will not run. You can compile only if there are no errors on the page.
Promoting Customer Data to the FastTab Header
Now Simon wants to highlight key customer information on his customer card page. He can do this by making the contents of some fields visible on the FastTab header, even when a FastTab is in its collapsed state.
To promote key customer data to the FastTab header
Open Object Designer if it is not already open.
In Object Designer, select page 50002, Kevin's Customer Card, which you created earlier, and choose Design to open the card page.
In Page Designer, under CustomerCardGroup, select a field in one of the FastTab groups. For example, in the General group, you can select Contact. This field will be displayed on the General FastTab.
With this row selected, on the View menu, choose Properties.
In the Importance property, set the Value field to Promoted.
Close the Properties window and close Page Designer. The Save Changes dialog box is displayed.
Choose Yes to save and compile Kevin's Customer Card page.
You have now successfully promoted Contact to the FastTab header.
Running the Page
Test your new card page by running the RoleTailored client.
To run the page
In Object Designer, select page 50002, Kevin's Customer Card, and then choose Run.
The Microsoft Dynamics NAV Windows client opens and displays the new card page with all the fields you selected.
Collapse the General FastTab on your card page and notice that the contact field you selected is displayed.
Next Steps
Simon wants to create a customer list page for his customers and to create a link from the list page to Kevin's Customer Card page.