


In this walkthrough, you will learn how to create a basic page that displays a list of customers.
Pages are used in Microsoft Dynamics NAV 2015 the same way that forms are used in earlier versions. Unlike forms, pages can be displayed on multiple clients, including the Microsoft Dynamics NAV Windows client. This flexibility lets you display the same information in different clients. Pages cannot be viewed in the Microsoft Dynamics NAV Development Environment.
 About this Walkthrough
This walkthrough provides an overview of how to create and run a simple list page in Microsoft Dynamics NAV, and demonstrates how to:
-
Create a list page.
-
Add controls to the page to display specific fields from a table.
-
Save the page.
-
Run the page in the RoleTailored client.
Prerequisites
The following prerequisites are required for this walkthrough:
-
Microsoft Dynamics NAV 2015 installed with a developer license.
-
CRONUS International Ltd. demonstration database
Story
Simon is a partner working for CRONUS International Ltd. Kevin, the Sales Manager at CRONUS, has contacted Simon and asked him to create a customer list.
Creating a List Page
To create Kevin's customer list, Simon knows that he needs to create a list page. Simon also needs to ensure that the card for a specific customer will open when Kevin selects the customer from the list.
 Note Note |
|---|
| In this walkthrough, to learn about the properties and controls of a list page you will create a list page from a blank page. Object Designer also includes a wizard that you can use to create a list page that sets up many properties and controls for you. For more information about the wizard, see How to: Create a Page. |
To create a List page
Open the Microsoft Dynamics NAV Development Environment, and then on the Tools menu, choose Object Designer.
In Object Designer, choose Page, and then choose New. The New Page window opens.
In the Table text box, choose the up arrow, select the Customer table, and then choose the OK button.
Select Create blank page, and then choose OK.
The new page opens in Page Designer.
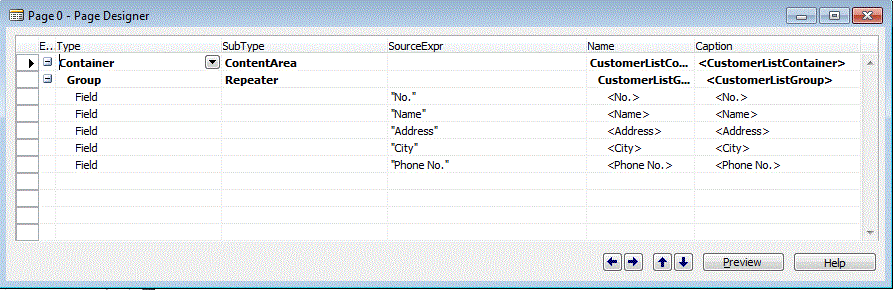
In the Name column of the first row, enter CustomerListContainer and accept the defaults values for the Type and the SubType fields.
Select a blank row, and on the View menu, choose Properties.
In the PageType property, set the Value field to List.
In the CardPageID property, set the Value field to 21 Customer Card.
Close the Properties window.
Adding Customer Information to the Page
Now that Simon has created a basic list page, he wants to add a control and the appropriate fields so that the page will display the number, name, address, city, and phone number for each customer in the list.
To add controls to the page
In Page Designer, in the Name column in the second row, type CustomerListGroup. Set Type to Group and set SubType to Repeater.
Note The CustomerListGroup is indented one level below the CustomerListContainer, indicating that it is a child of, and will be displayed within, the CustomerListContainer. Select the third row.
On the View menu, choose Field Menu.
The Field Menu window opens, displaying the list of available fields from the Customer table (Table 18).
Select multiple fields by holding down the Ctrl key while you select the following rows:
-
No.
-
Name
-
Address
-
City
-
Phone No.
-
No.
Choose the OK button.
A message box appears with the following message: "Do you want to add the fields that are selected in the field menu?"
Note If the OK button in the Field Menu window is inactive, you can commit the field changes by choosing Page Designer. Choose Yes.
The following illustration shows the Page Designer window.
Saving and Running the Page
Now that Simon's page is complete, he wants to see how it looks. Eventually, he will add an action to another page so Kevin can access the page. But while he is still working on it, Simon can save the page and then quickly run it in the RoleTailored client using the following procedure.
To save and run the page
From the File menu, choose Save, or press Ctrl + S.
The Save As dialog box opens.
In the ID field, enter 50000.
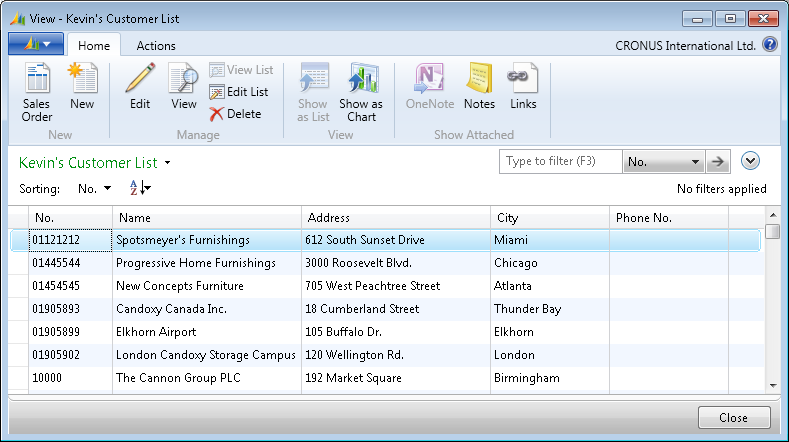
In the Name field, enter Kevin's Customer List.
Make sure Compile is selected and choose the OK button.
This name is displayed in the page's ribbon.
In Object Designer, select the page 50000 Kevin's Customer List, and then choose Run to view the page.
The RoleTailored client opens and displays the customer list page. The following illustration shows a customer list page.
Next Steps
Next, Simon needs to add actions to the customer list page. He decides that he wants to add a Sales Order action. When selected, this action will create a new sales order.