Word report layouts are built on custom XML parts. A custom XML part is structured XML that represents the dataset of a Microsoft Dynamics NAV report. The custom XML part is used to map the data into a report when the report is run from a Microsoft Dynamics NAV client.
XML Structure of Custom XML Part
A custom XML part for a Microsoft Dynamics NAV report consists of elements that correspond to the data items, columns, and labels that comprise the report's dataset as defined in the Report Dataset Designer in Microsoft Dynamics NAV Development Environment.
The following table provides a simplified overview of the XML of a custom XML part.
| XML Elements | Description |
|---|---|
| Header |
| XML namespace specification. |
| Contains all the labels for the report. The element includes labels that are related to columns that have the IncludeCaption Property set to Yes and labels that are defined in Report Label Designer.
|
| Top-level data item and columns. Columns are listed in alphabetical order. The element names and values are determined by the Name Property of the data item or column. |
| Data items and columns that are nested in the top-level data item. Columns are listed in alphabetical order under the respective data item. |
| Closing element. |
Custom XML Part in Word
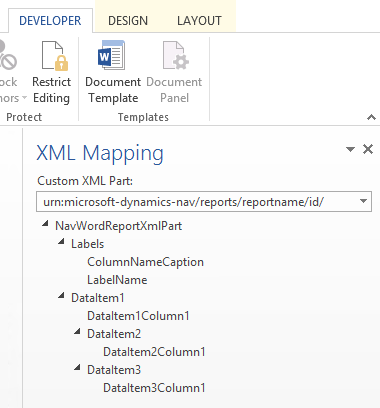
In Word, you open the custom XML part in the XML Mapping pane, and then use the pane to map elements to content controls in the Word document. The XML Mapping pane is accessible from the Developer tab (for more information, see How to: Show the Developer Tab on the Ribbon).
The elements in the XML Mapping pane appear in a structure that is similar to the XML source. Label fields are grouped under a common Labels element and data item and columns are arranged in a hierarchal structure that corresponds to the XML source, with columns listed in alphabetical order. Elements are identified by their name as defined by the Name property in Report Dataset Designer in development environment.
The following figure illustrates the simple custom XML part from the previous section in the XML Mapping pane of a Word document.

-
To add a label or field to the layout, you insert a content control that maps to the element in the XML Mapping pane.
-
To create repeating rows of columns, insert a Repeating content control for the parent data item element, and then add content control for the columns.
-
For labels, the actual text that appears in the generated report is the value of the Caption property for the field in the data item table (if the label is related to the column in the report dataset) or a label in the Report Label Designer (if the label is not related to a column in the dataset).
-
The language of the label that is displayed when you run the report depends on the language setting of the report object. For more information, see Multiple Document Languages and Viewing the Application in Different Languages.
For information about how to open the custom XML part in Word and add fields, see How to: Add Fields to a Word Report Layout.


