


In this walkthrough, you will install Microsoft Dynamics NAV 2015 in a production environment, with each of the three Microsoft Dynamics NAV tiers (client, server, database) on a separate computer:
| Computer | Installed operating system and software | Tier |
|---|---|---|
NAVSQL | Microsoft Windows Server 2008 R2 with the 64-bit edition of SQL Server 2008 R2 installed. You will install Microsoft Dynamics NAV database components on this computer. | Database |
NAVSERV | Microsoft Windows Server 2008 R2. You will install Microsoft Dynamics NAV Server on this computer. | Server (middle) |
NAVCLIENT | Windows 7. You will install the Microsoft Dynamics NAV Windows client on this computer. | Client |
 Note Note |
|---|
| For information on system requirements for Microsoft Dynamics NAV 2015 components, see System Requirements for Microsoft Dynamics NAV 2015. |
The key characteristic of this walkthrough is that the Microsoft Dynamics NAV Windows client, Microsoft Dynamics NAV Server, and SQL Server are installed on separate computers. In a production environment, you may have multiple computers running SQL Server, multiple computers running Microsoft Dynamics NAV Server, and multiple computers running the Microsoft Dynamics NAV Windows client. When any client user is accessing Microsoft Dynamics NAV Server on a remote computer and SQL Server on a different remote computer, the procedures and issues presented in this walkthrough apply.
For information about how to configure deployments where Microsoft Dynamics NAV Server and SQL Server are installed on a single computer, see Walkthrough: Installing the Three Tiers On Two Computers.
 Domain User Account vs. Network Service
In this walkthrough, the SQL Server service and Microsoft Dynamics NAV Server share a domain user account. No other application or service uses this account.
You could run SQL Server or Microsoft Dynamics NAV Server using the credentials of the Network Service account. But this is considered less secure because the Network Service account is a shared account that can be used by other unrelated network services. Any users who have rights to this account have rights to all services that are running on this account. Running SQL Server and Microsoft Dynamics NAV Server under a dedicated domain user account is more secure but requires more work by a domain administrator, as described in this walkthrough.
About This Walkthrough
After completing this walkthrough, you will have a functioning three-tier installation on three computers. The installation uses the CRONUS International Ltd. demonstration database, which contains the CRONUS International Ltd. company.
This walkthrough illustrates the following tasks:
-
Installing the Microsoft Dynamics NAV database components.
-
Installing Microsoft Dynamics NAV Server.
-
Configuring Microsoft Dynamics NAV Server to run using the credentials of a dedicated domain user account.
-
Installing the Microsoft Dynamics NAV Windows client.
Prerequisites
To complete this walkthrough, you need three computers that are configured as described in the introduction.
If SQL Server is not present on the computer where you install the SQL Server Database Components, then Setup automatically installs the 64-bit edition of SQL Server Express 2008 R2, which you can use for prototyping, developing, and testing. We recommend that you use SQL Server 2008 R2 in production environments. For that reason, this walkthrough assumes that you have installed a non-Express version of SQL Server 2008 R2, and then created a SQL Server instance named NAVDEMO, before you begin. For more information, see Installation Considerations for Microsoft SQL Server.
Story
A consultant wants to install Microsoft Dynamics NAV 2015 in a production environment.
-
She installs Microsoft Dynamics NAV database components on a Windows Server 2008 R2 computer (NAVSQL) where she has already installed Microsoft SQL Server 2008 R2.
-
She installs Microsoft Dynamics NAV Server on a Windows Server 2008 R2 computer (NAVSERV).
-
She creates a domain user account in Active Directory and uses Microsoft Dynamics NAV Server Administration tool to configure a Microsoft Dynamics NAV Server instance to run using that account’s credentials.
-
She installs the Microsoft Dynamics NAV Windows client on a Windows 7 computer (NAVCLIENT) and configures it to communicate with Microsoft Dynamics NAV Server.
Installing the Microsoft Dynamics NAV Database Components
When you run Microsoft Dynamics NAV 2015 Setup, you see a menu of installation options. You configure the Server Option to install the SQL Server Database components and the CRONUS International Ltd. demonstration database. When Setup is finished, you start the SQL Browser Service on the SQL Server.
To install the Microsoft Dynamics NAV database components and the demo database
Insert the Microsoft Dynamics NAV 2015 installation media in the drive of NAVSQL, which is the computer where SQL Server 2008 R2 is already installed.
On the introductory pane, choose Next.
To accept the license terms, choose I accept.
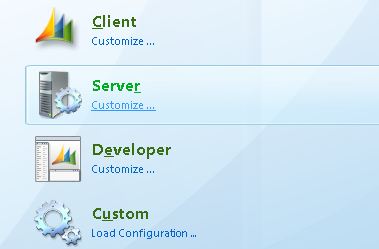
On the Microsoft Dynamics NAV Setup page, choose Choose an installation option.
On the Choose an installation option page, choose Customize underneath the Server option.
On the Customize the installation page, choose the SQL Server Database Components box, and then select Run all from My computer.
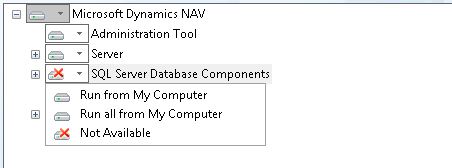
This specifies that you want to install this component and all subcomponents. In this case, there is a single subcomponent, which is the CRONUS International Ltd. demonstration database.
Choose the Server box, and then choose Not Available. Choose the Administration Tool box, and then choose Not Available.
This excludes server components that you will install later on a different computer.
Your list of components should now look like this:
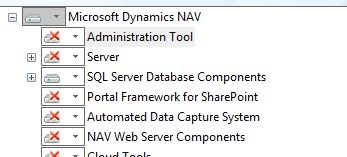
Choose Next.
On the Specify parameters page, do not modify any parameters, and then choose Apply.
Setup installs the database components.
After the installation is complete, choose Close.
Starting the SQL Server Browser Service on the SQL Server
When you installed the Microsoft Dynamics NAV database components, the CRONUS International Ltd. demonstration database was installed on a database instance named NAVDEMO. Because you are using a named database instance and Microsoft Dynamics NAV Server is on a separate computer, you must enable and start the SQL Server Browser Service on the SQL Server computer to ensure the Microsoft Dynamics NAV Server can connect to the database instance.
To start SQL Server Browser Service
On the computer running SQL Server, run the SQL Server Configuration Manager.
On the Start menu, in the Search Programs and Files box, type SQL, and then choose SQL Server Configuration Manager.
In SQL Server Configuration Manager, in the navigation pane on the left, choose SQL Server Services.
Right-click SQL Server Browser, and then choose Properties.
On the Service tab in the SQL Server Browser dialog box, set the Start mode to Automatic.
Choose OK to return to the SQL Server Configuration Manager main page.
Right-click SQL Server Browser again, and then choose Start.
Installing Microsoft Dynamics NAV Server
The next step is to install Microsoft Dynamics NAV Server on NAVSERV. This is a different computer from the one where you installed the Microsoft Dynamics NAV database components.
To install Microsoft Dynamics NAV Server
Insert the Microsoft Dynamics NAV installation media into the drive of NAVSERV.
On the introductory page, choose Next.
To accept the license terms, choose I accept.
On the Microsoft Dynamics NAV Setup page, choose Choose an installation option.
On the Choose an installation option page, choose Server.
In this case, you do not need to customize the parameter list. By choosing Server instead of Customize, you bypass the Customize the installation page.
On the Specify parameters page, type NAVSQL, which is the name of the computer running SQL Server.
Default values are sufficient for all other parameters.
Choose Apply to save your setting information. Setup installs the components.
After the installation is complete, choose Close.
Configuring Microsoft Dynamics NAV Server to Run Using the Credentials of a Dedicated Domain User Account
The steps for creating a domain user account using the Active Directory Users and Computers utility (dsa.msc) are available in the Windows Server 2008 and Windows Server 2008 R2 documentation. For more information, see Create a New User Account in the TechNet Library. You must be a network administrator to perform this task.
After you create the account, you must give it the necessary permissions and privileges to interact securely with Microsoft Dynamics NAV clients and SQL Server databases. To do this, complete the procedures in Provisioning the Microsoft Dynamics NAV Server Account.
Then follow these steps to configure a Microsoft Dynamics NAV Server instance to use a domain user account. This procedure uses the default Microsoft Dynamics NAV Server instance because this instance is always present. It works for any other instance that you create. For more information, see Managing Microsoft Dynamics NAV Server Instances.
To configure a Microsoft Dynamics NAV Server instance to use a domain user account
Start the Microsoft Dynamics NAV Server Administration tool on NAVSERV, which is the computer running Microsoft Dynamics NAV Server. Choose Start, and in the Search programs and files box, enter Microsoft Dynamics NAV Administration, and then choose the related link.
Microsoft Dynamics NAV Server Administration tool is a default component for the Server Option.
Choose Microsoft Dynamics NAV (Local), under Console Root, in the left pane of the Microsoft Dynamics NAV Server Administration tool, to display all Microsoft Dynamics NAV instances on the server computer in the center pane:
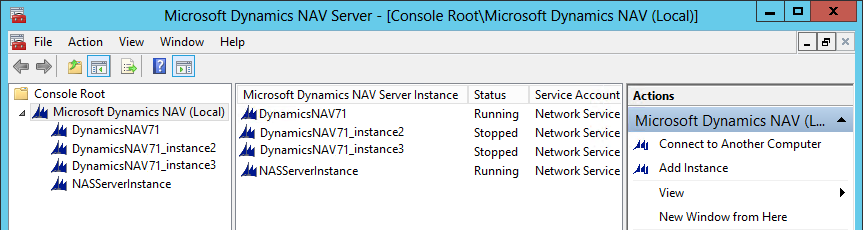
In the left pane, choose the default instance, then right-click it, then choose Log on Account.
Choose the Edit button at the bottom of the center pane.
In the Service Account field, choose the drop-down arrow, and then choose User Account.
In the remaining fields, enter the correct values in the User name, Domain, and Password fields. Enter the password again in the Confirm Password field.
Choose Save.
Now restart the Microsoft Dynamics NAV Server instance to enable the new login account. To do this, choose the Microsoft Dynamics NAV Server computer in the left pane.
Except when you are administering a remote computer, this is Dynamics NAV (Local).
In the center pane, right-click the instance, and then choose Restart.
Installing the RoleTailored Client
The final task is to install the Microsoft Dynamics NAV Windows client to NAVCLIENT, which is a computer running Windows 7.
To install the RoleTailored client
Insert the Microsoft Dynamics NAV installation media into the drive of NAVCLIENT.
On the introductory page, choose Next.
To accept the license terms, choose I accept.
On the Microsoft Dynamics NAV Setup page, choose Choose an installation option.
On the Choose an installation option page, choose Client.
On the Specify parameters page, in the Server Name field, enter NAVSERV, which is the name of the computer running Microsoft Dynamics NAV Server.
You should fully qualify the domain name in this field in the form YourServer. YourDomain. YourCompany.com.
Choose Apply to begin install the components.
After installation is complete, choose Close.
Establishing a Connection
The configuration is now complete. You should be able to start the RoleTailored client and connect to the CRONUS International Ltd. demonstration database.
If you cannot connect the Microsoft Dynamics NAV Windows client to Microsoft Dynamics NAV Server after completing this procedure, then the problem may be that Microsoft Dynamics NAV Server is not able to establish a connection to SQL Server. For more information, see Troubleshooting: SQL Server Connection Problems.
Next Steps
You have now installed all Microsoft Dynamics NAV components. When you start the Microsoft Dynamics NAV Windows client, it connects to Microsoft Dynamics NAV Server and to CRONUS International Ltd., which is the demonstration company that is associated with the demonstration database.
The next steps are to upload your license, create users, and integrate them into the Microsoft Dynamics NAV security system. For more information, see How to: Upload the License File, How to: Create Microsoft Dynamics NAV Users, and Managing Users.