


By default, fields in a FastTab are arranged automatically in two columns that are based on the number of fields. You can use the GridLayout control to arrange the fields manually in one or more rows and columns. The GridLayout control gives you the following options:
-
Set up your grid row-by-row or column-by-column.
-
Span a field across multiple rows and columns.
-
Show or hide field captions.
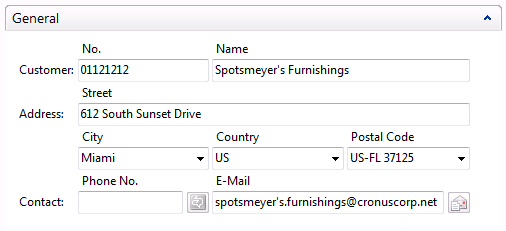
The following figure illustrates a page that uses the GridLayout control to display fields from table 18, Customer, in the CRONUS International Ltd. demonstration database. The fields are arranged in four rows.
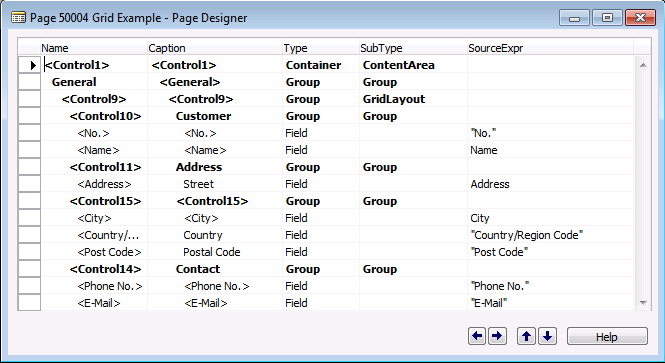
The following figure shows Page Designer for the GridLayout example.
Setting Up Fields in Rows and Columns on a Page
To add rows and columns of fields to a page, you set up a GridLayout control in a FastTab of the page. When you set up the GridLayout control, you specify whether fields are arranged in rows or columns. After you set the GridLayout control, you can add fields in rows and columns of fields by adding Group controls under the GridLayout control. Each Group control defines either a row or column, depending on the setup of the GridLayout control.
To set up a GridLayout control in a FastTab
In Page Designer, open a page.
Insert a row, and then set the Type column to Group.
This defines the FastTab that contains the fields of the grid.
To specify a heading for the FastTab, type the text in the Caption column.
Under the new Group control, insert a row, and then set the Type column to Group and the Subtype column to GridLayout.
Select the new GridLayout control, and on the View menu, choose Properties.
In the Properties window, in the Value column of the Layout property, choose the drop-down arrow. Set the Layout Property as follows:
-
Select Rows to set up fields row-by-row.
-
Select Columns to set up fields column-by-column. This is the default setting.
-
Select Rows to set up fields row-by-row.
To add a row or column of fields to the GridLayout control
In Page Designer, under the GridLayout control, insert a row, and then set the Type column to Group and the Subtype column to Group.
This defines a container for the row or column of fields, depending on the value that you set the Layout property to in the previous procedure.
To specify a heading for the row or column, type the text in the Caption field of the Group control.
 Note
Note If you are setting up a row, then a colon is automatically added to the end of a row heading on the rendered page. To add fields to the row or column, do the following:
-
Under the Group control, insert a blank line, and then set the Type column to Field.
-
In the SourceExpr column, type the name of the data source, such as a field in the table that is associated to the page.
-
To include a caption for the field, type the text in the Caption column.Note
By default, field captions display above the field. If you want to hide or reposition the caption, then see Hiding Field Captions.
-
Under the Group control, insert a blank line, and then set the Type column to Field.
Setting Fields to Span Multiple Rows and Columns
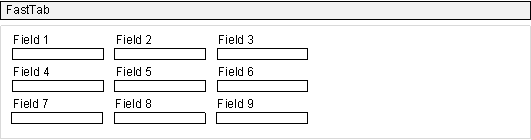
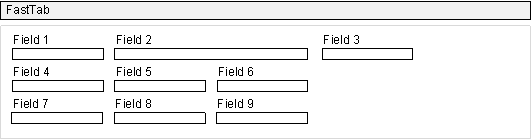
You can set a field to span multiple rows or columns. When you set a field to span multiple rows, the field occupies the cells in the rows below it, and existing fields in the occupied cells are moved to the right. For example, the following figure illustrates a GridLayout control that consists of six fields arranged in three rows.
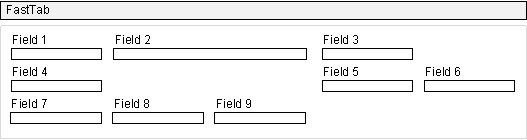
If you set Field 2 to span two rows, then the following layout is displayed:
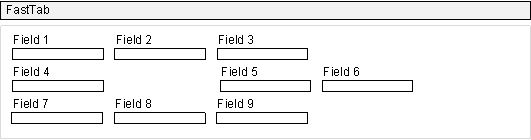
When you set a field to span multiple columns, the field occupies the cells in the columns to the right, and existing fields in the occupied cells are moved to the right. Using the previous GridLayout example, if you set Field 2 to span two columns instead of two rows, the following layout is displayed:
You can also set a field to span multiple rows and columns. For example, if you set Field 2 to span two rows and two columns, the following layout is displayed:
 Important Important |
|---|
| The Microsoft Dynamics NAV Web client does not support row and column spanning for fields. If the page displays in the Microsoft Dynamics NAV Web client, the fields appear without spanning. |
To set a field to span rows and columns
Under the GridLayout control, select the field that you want to set to span rows or columns, and then on the View menu, choose Properties.
In the Properties window, do the following:
-
To set a field to span one or more rows, set the value of the RowSpan Property to the number of rows.
-
To set a field to span one or more columns, set the value of the ColumnSpan Property to the number of columns.
-
To set a field to span one or more rows, set the value of the RowSpan Property to the number of rows.
Hiding Field Captions
To hide a field caption
Select the field, and then on the View menu, choose Properties.
In the Properties window, set the value of the ShowCaption Property to No