


This document contains instructions for deploying the Microsoft Dynamics NAV Windows client using the ClickOnce deployment technology. ClickOnce allows you to deploy web applications by choosing a link on a web page. ClickOnce is a component of the Microsoft .NET Framework.
ClickOnce Installation
This section covers the end user experience of installing Microsoft Dynamics NAV deployed with ClickOnce. The end user will choose the link to the application to install Microsoft Dynamics NAV. The link may point to a file share or a website. The ClickOnce runtime opens with a confirmation dialog box, such as the dialog box shown in the following illustration.
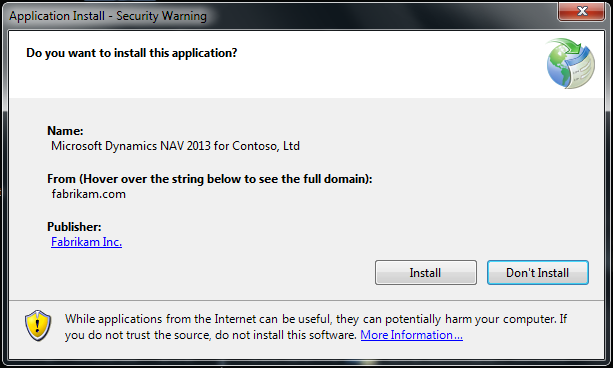
If you choose the Install button, ClickOnce downloads all the necessary files to a local folder on your computer.
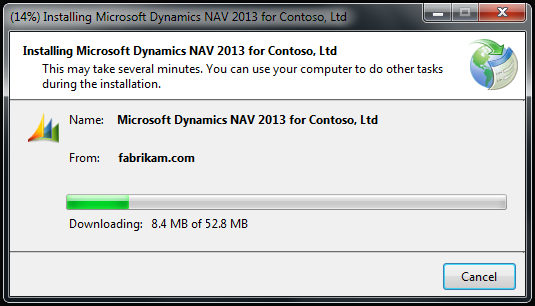
When the download is complete, ClickOnce starts the Microsoft Dynamics NAV Windows client, and also installs a program shortcut on the Start menu.
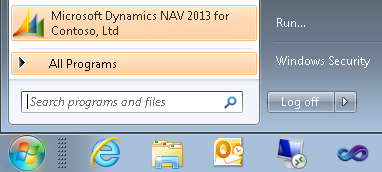
The next time that you want to run the Microsoft Dynamics NAV Windows client, you can either select the link again, or you select the shortcut on the Start menu. In either case, ClickOnce will check if there is a newer version available, which you will have the option to install.
No configuration of the ClientUserSettings.config file is needed during install or after install as this is set up as part of the ClickOnce deployment.
Benefits of a ClickOnce Deployment of the Microsoft Dynamics NAV Windows Client
ClickOnce includes the following benefits:
-
Allows for a centralized configuration. The ClientUserSettings.config configuration file that is installed with the Microsoft Dynamics NAV Windows client contains several settings that must be adjusted for the specific installation, such as the server address and the authentication type to use. By using ClickOnce, you can control the ClientUserSettings.config centrally and push it out to the client computers. Configuration is not required on the individual client computer. If you make a mistake, or if the settings have to change, such as if you want to move the NAV Server to a different computer, then you can create an updated configuration file by using the upgrade capability.
-
Allows for bundled add-ins. By using ClickOnce, you can easily deploy your own assemblies and third-party add-in assemblies. You do not have to copy add-in files after the installation.
-
You can have side-by-side installations. You cannot have two MSI-based Microsoft Dynamics NAV Windows clients on the same computer. A ClickOnce-deployed Microsoft Dynamics NAV Windows client does not interfere with other ClickOnce-deployed Microsoft Dynamics NAV Windows clients. This makes it easy to run against different servers from the same computer. For example, you could have two Microsoft Dynamics NAV Windows client installations, one for a production server and one for a test server. This also means that you can run different versions of the Microsoft Dynamics NAV Windows client side-by-side, which is not possible with MSI.
-
Multiple languages can be included in the same installer. By using ClickOnce, you can decide which files, such as language resource files and Help files, that you want to include in the deployment. End users will not be aware of the difference between installing an EN-US-only version and a version with several additional languages.
-
Administrator permissions are not required. By using ClickOnce, a typical Windows user can install the Microsoft Dynamics NAV Windows client. The prerequisites for installation require administrator permissions. These prerequisites have to be installed one time on the computer, after which any user can install and upgrade the Microsoft Dynamics NAV Windows client.
-
ClickOnce supports a seamless upgrade. End users will hardly notice when the Microsoft Dynamics NAV Windows client is upgraded.
The result should be that end users can install the Microsoft Dynamics NAV Windows client without relying on partners or super users to do it for them.
There are some limitations of a ClickOnce-installed Microsoft Dynamics NAV Windows client. For more information, see Limitations of ClickOnce Installed on the Microsoft Dynamics NAV Windows Client.
Technical Overview of ClickOnce
ClickOnce is a standard .NET technology that has existed since .NET Framework 2.0. The instructions in this document are meant to help you start working with ClickOnce deployment, however ClickOnce has additional features that are not described in this document.
The file structure of a ClickOnce deployment is as follows:
-
Assuming that you have a folder that contains your application files, such as the EXE, DLLs, configuration files, and other files that your application needs. The files should be organized in subfolders as appropriate for your application to work correctly.
-
You create an XML file, usually called the application manifest. This file should be suffixed with .manifest, and added in the root of your application folder. The application manifest file contains metadata about your application including a list of all the files, which file is the main executable file, and so on.
-
You create another XML file, usually called the deployment manifest. This file should be suffixed with .application, and added to the directory outside the root of your application folder. The deployment manifest has a link to the application manifest. It also has information about the application, such as a product name, version number, and so on. This information will be shown in locations such as the Start menu and in Add or Remove Programs.
When a user installs the application, he runs the deployment manifest, and then ClickOnce will automatically install the application.
Installing Prerequisites
The Microsoft Dynamics NAV Windows client has two prerequisites, the Microsoft Report Viewer and the .NET Framework 4.5. Both are linked from the sample web page.
Installing these prerequisites requires administrative rights on the computer. If the end users are not already administrators on their computers, then an administrator or a super user must first install the prerequisite on the computer. After that is complete, any user on the computer can install, uninstall, and upgrade the Microsoft Dynamics NAV Windows client. Administrative rights are not needed for the Microsoft Dynamics NAV Windows client.
The install experience can be improved for the end user by providing a solution that packages the Microsoft Report Viewer with the ClickOnce installation. Microsoft Certified Partners may download and redistribute the Microsoft Report Viewer 2012 Redistributable Package. Microsoft Windows operating systems are subject to compliance with the Supplemental Redist License located at Microsoft Download Center.
The Microsoft Report Viewer is an optional component. If it is not installed, the end user will get an error message when trying to print or preview reports in the Microsoft Dynamics NAV Windows client. All other functionality in the client will not be affected.
The .NET Framework 4.5 is pre-installed on Windows 8 and Windows Server 2012 computers and no action has to be taken. For more information about how to install .NET 4.5 Framework on earlier versions of Windows, see Installing .NET 4.5 Framework.
Deploying Using ClickOnce Hosted on a File Share
It is easier to host a ClickOnce deployment on a file share than it is to host on a web server. Hosting on a web server is basically the same, except that you may need to make some adjustments to IIS. Hosting on a web server is covered later in this document.
Follow these steps to host on a file share:
-
Install the Microsoft Windows SDK for Windows 7 and the .NET Framework 4. The SDK contains a utility named mage.exe, which is required in several of the following steps. It also contains utilities for creating test certificates.
-
Download and install "Microsoft Windows SDK for Windows 7 and the .NET Framework 4" from Microsoft Download Center.
 Important
 It is important that you have "Microsoft Windows SDK for Windows 7 and the .NET Framework 4". Ensure you have the correct version of mage.exe. Locate the mage.exe in file explorer, right-click and select Properties. In the Properties window, choose the Details tab and make sure that the file version is 4.0.40391.1. -
The mage.exe utility should be located in the equivalent of the following location:
C:\Program Files (x86)\Microsoft SDKs\Windows\v7.1\Bin\NETFX 4.0 Tools\mage.exe
-
Download and install "Microsoft Windows SDK for Windows 7 and the .NET Framework 4" from Microsoft Download Center.
-
Optionally, obtain a code signing certificate. This is a certificate that is issued by a certification authority, and will enable you to sign the application in such a way that end users can see that the application is published by the expected provider and, for example, not by a phisher.
-
If you do not already have a code signing certificate, you will have to obtain one from one of the certification authorities. For a list of certification authorities, see Microsoft Technet.
-
You can also create a test certificate and use it for testing. For more information, see How to: Create Your Own Test Certificate.
-
For information about when it is acceptable to skip this step, see Security Considerations.
-
If you do not already have a code signing certificate, you will have to obtain one from one of the certification authorities. For a list of certification authorities, see Microsoft Technet.
-
Install the ClickOnce Installer Tools. Run setup.exe and install the ClickOnce Installer Tools. The files will be installed in C:\Program Files (x86)\Microsoft Dynamics NAV\80\ClickOnce Installer Tools.
-
Perform a typical installation of the Microsoft Dynamics NAV Windows client by doing the following:
-
Run setup.exe to install the Microsoft Dynamics NAV Windows client. Do not install unnecessary client components, such as the Microsoft Dynamics NAV Development Environment and the Excel add-in. These add to the download size, and contain special file types that can create problems for a ClickOnce deployment. For example, the Web.config file installed with the development environment can create problems when it is hosted on a web server.
-
Install relevant language packs.
-
Add additional add-ins, if you have any.
-
Run the client, and make sure that everything works as expected.
-
Run setup.exe to install the Microsoft Dynamics NAV Windows client. Do not install unnecessary client components, such as the Microsoft Dynamics NAV Development Environment and the Excel add-in. These add to the download size, and contain special file types that can create problems for a ClickOnce deployment. For example, the Web.config file installed with the development environment can create problems when it is hosted on a web server.
-
Copy the files to a file share, such as \\fileshare\clickonce.
-
Create a folder, such as \\fileshare\clickonce\Deployment\ApplicationFiles.
-
Copy all the files from C:\Program Files (x86)\Microsoft Dynamics NAV\80\RoleTailored Client to this new folder.
-
Move ClientUserSettings.config to that folder.
This file typically installs to the equivalent of C:\Program Data\Microsoft\Microsoft Dynamics NAV\80\, or C:\Users\user name\AppData\Roaming\Microsoft\Microsoft Dynamics NAV\80\. The exact location depends on your operating system.
-
Create a folder, such as \\fileshare\clickonce\Deployment\ApplicationFiles.
-
Copy the template files. The ClickOnce Installer Tools installation contains template files that will be useful starting points.
-
Copy the files in C:\Program Files (x86)\Microsoft Dynamics NAV\80\ClickOnce Installer Tools\TemplateFiles to \\fileshare\clickonce.
-
Copy the files in C:\Program Files (x86)\Microsoft Dynamics NAV\80\ClickOnce Installer Tools\TemplateFiles to \\fileshare\clickonce.
-
The Microsoft Dynamics NAV 2015 Windows client requires Microsoft Report Viewer 2014 for viewing and printing a report. Therefore, this is a prerequisite install in the ClickOnce scenario. Currently, there is no officially available download link from Microsoft for Microsoft Report Viewer 2014, which leaves you with two options:
-
Use Microsoft Report Viewer 2014 and Microsoft SQL Server CLR Types 2014 by providing your own redistribution share. Copy the Report Viewer 2014 installer, ReportViewer.msi, from the Microsoft Dynamics NAV 2015 DVD path <DVD>\Prerequisite Components\Microsoft Report Viewer 2014\ to a share of your choice and update the Report Viewer install link inside the landing page NAVCLientInstallation.html to the created share location.
-
Use Microsoft Report Viewer 2012 and Microsoft SQL Server CLR Types 2012, which Microsoft Dynamics NAV 2015 is also compatible with. These files are available from Microsoft: Microsoft Report Viewer 2012 Runtime and SQL Server CLR Types 2012.
Update the two Report Viewer install links inside the landing page NAVClientInstallation.html to point to these.
In addition, the Microsoft Dynamics NAV Windows client needs to be aware that it should run on the old version. In your install folder, open Microsoft.Dynamics.Nav.Client.exe.config and locate the <assemblyBinding xmlns="urn:schemas-microsoft-com:asm.v1"> Xml Element. Insert the following Xml Element as a child node under assemblyBinding: Copy Code
<dependentAssembly>
     <assemblyIdentity name="Microsoft.ReportViewer.WinForms" publicKeyToken="89845dcd8080cc91" culture="neutral"/>
     <bindingRedirect oldVersion="12.0.0.0" newVersion="11.0.0.0"/>
</dependentAssembly>
-
Use Microsoft Report Viewer 2014 and Microsoft SQL Server CLR Types 2014 by providing your own redistribution share. Copy the Report Viewer 2014 installer, ReportViewer.msi, from the Microsoft Dynamics NAV 2015 DVD path <DVD>\Prerequisite Components\Microsoft Report Viewer 2014\ to a share of your choice and update the Report Viewer install link inside the landing page NAVCLientInstallation.html to the created share location.
-
Update the application manifest. The application manifest lists the files that are part of the installation.
-
Open a command prompt using the Run as administrator option, and change the directory to C:\fileshare\clickonce\Deployment\ApplicationFiles.
-
Use mage.exe to update the manifest file to have the correct files as shown in the following code example.
mage.exe -Update Microsoft.Dynamics.Nav.Client.exe.manifest -FromDirectory .Important You must specify the fully qualified path to mage.exe, such as C:\Program Files (x86)\Microsoft SDKs\Windows\v7.1\Bin\NETFX 4.0 Tools\mage.exe.
-
Open a command prompt using the Run as administrator option, and change the directory to C:\fileshare\clickonce\Deployment\ApplicationFiles.
-
Update the application manifest. Open Microsoft.Dynamics.Nav.Client.exe.manifest in Notepad. You do not have to change anything in this file, but you should be aware of what it looks like. The application manifest has an identity (assembly.assemblyIdentity), which is referred to by the deployment manifest. This can be any string, and it will not be shown to end users. Note the version number, which will be used in upgrade scenarios.
-
Optionally, sign the application manifest. If you do not sign the manifest, the user will get a security warning when he installs, because the publisher, who is you, cannot be verified. This means that the end user cannot distinguish between your application and malware. If you sign the manifest, the user will see that the application is coming from your company, and he will trust it. If you have the code signing certificate PartnerCodeSigningCertificate.cer and the private key PartnerPrivateKey.pvk, run the following commands.
cert2spc PartnerCodeSigningCertificate.cer PartnerSoftwarePublisherCertificate.spcpvk2pfx -spc PartnerSoftwarePublisherCertificate.spc -pvk C:\PrivateFolder\PartnerPrivateKey.pvk -pfx PartnerPersonalInformationExchange.pfxmage.exe -sign Microsoft.Dynamics.Nav.Client.exe.manifest -certfile PartnerPersonalInformationExchange.pfx
Now the application manifest is signed. If you modify it, you will have to sign it again. For information about when it is acceptable to skip this step, see Security Considerations. -
Update the deployment manifest.
-
Change the directory to C:\fileshare\clickonce\Deployment.
-
Change the link to the application manifest and update its hash value.
mage.exe -update Microsoft.Dynamics.Nav.Client.application -appmanifest ApplicationFiles\Microsoft.Dynamics.Nav.Client.exe.manifest -appcodebase \\fileshare\clickonce\Deployment\ApplicationFiles\Microsoft.Dynamics.Nav.Client.exe.manifest -
Open Microsoft.Dynamics.Nav.Client.application in Notepad, and do the following:
-
Adjust the
assembly.assemblyIdentity.nameso that it is unique. For example, you could add the customer’s name to the name, and if you deploy a test and a production server for the customer, then you could add production or test to the name. You should never change this value after end users have used it to install the Microsoft Dynamics NAV client. The value will not be shown to end users. -
Adjust the description contents as appropriate. For example, you could change the publisher to be "Microsoft Corporation and <your company name>", and change the product to be "Microsoft Dynamics NAV 2015 for <customer name>". These are the names that the end user will see.
-
Change the link in
deploymentProviderto \\fileshare\clickonce\Deployment\Microsoft.Dynamics.Nav.Client.application. As you can see, it is now pointing to itself so that it is possible to check for updates.
-
Adjust the
-
Change the directory to C:\fileshare\clickonce\Deployment.
-
Optionally, sign the deployment manifest. This is similar to the application manifest.
mage.exe -sign Microsoft.Dynamics.Nav.Client.application -certfile PartnerPersonalInformationExchange.pfx.
After the deployment manifest is signed, if you modify it, you will have to sign it again. For information about when it is acceptable to skip this step, see Security Considerations. -
Now you should be done with your ClickOnce deployment, so you can test the ClickOnce deployment. Run the deployment manifest by choosing \\fileshare\clickonce\Deployment\Microsoft.Dynamics.Nav.Client.application.
 Note
Note Do not run the deployment from C:\fileshare\clickonce\Deployment\Microsoft.Dynamics.Nav.Client.application. This will give you an error that the deployment and application are in different security zones. -
Verify that everything works as expected. The ClickOnce files are typically installed under C:\Users\user name\AppData\Local\Apps. In the next step, you will have to know where these files are installed, so locate the files by searching for Microsoft.Dynamics.Nav.Client.exe under that folder or by typing: dir /s Microsoft.Dynamics.Nav.Client.exe.
-
As a final verification, we recommend that you compare the files that were installed by ClickOnce, in the folder you searched for, to the files that were installed by the MSI installer in C:\Program Files\.... There will be some differences. For example, there will be multiple manifest files in the ClickOnce folder. You should review these differences and make sure they are as expected. For example, if you see a .DLL file in one folder, but not the other, this could cause an error.
In addition to creating the installer itself, you should require end users to read and accept Microsoft’s software license terms (SLT) as part of the installation experience.
Deploying Using ClickOnce Hosting on a Web Server
Hosting on a web server is similar to hosting on a file share. Using the steps outlined in the previous section, you should note that the two links in the deployment manifest should point to the http:// address, instead of a \\fileshare address. This is the only change that you need to make to the files.
All the logic needed for requesting user permissions to install or check for upgrades happens on the client computer. The web server works like a file repository.
The only problem with web server hosting is that web servers use different file types differently. For example, by default a file that has the .config extension will not be downloadable from a web server. The web server will restrict access to it. To work around this, you can create a web.config file in the folder that contains the application files, with contents similar to the following.
| Copy Code | |
|---|---|
<?xml version="1.0" encoding="UTF-8"?>
<configuration>
  <system.webServer>
    <directoryBrowse enabled="true" />
    <staticContent>
      <mimeMap fileExtension=".config" mimeType="application/x-msdownload" />
      <mimeMap fileExtension=".tlb" mimeType="application/x-msdownload"/>
      <mimeMap fileExtension=".olb" mimeType="application/x-msdownload"/>
      <mimeMap fileExtension=".pdb" mimeType="application/x-msdownload"/>
      <mimeMap fileExtension=".hh" mimeType="application/x-msdownload"/>
      <mimeMap fileExtension=".xss" mimeType="application/x-msdownload"/>
      <mimeMap fileExtension=".xsc" mimeType="application/x-msdownload"/>
      <mimeMap fileExtension=".stx" mimeType="application/x-msdownload"/>
      <mimeMap fileExtension=".msc" mimeType="application/x-msdownload"/>
      <mimeMap fileExtension=".flf" mimeType="application/x-msdownload"/>
      <mimeMap fileExtension=".rdlc" mimeType="application/x-msdownload"/>
      <mimeMap fileExtension=".sln" mimeType="application/x-msdownload"/>
</staticContent>
    <security>
      <requestFiltering>
        <fileExtensions>
          <remove fileExtension=".config" />
        </fileExtensions>
      </requestFiltering>
    </security>
  </system.webServer>
</configuration> | |
You should start with an empty .config file, and then use trial-and-error to add the necessary rules, until ClickOnce can download all the files. If ClickOnce cannot download the files, a report will show which file and which extension is the problem.
Requiring End Users to Read and Accept Software License Terms
End users who install the Microsoft Dynamics NAV Windows client are required to accept the Microsoft software license terms. By using the traditional Microsoft Dynamics NAV Windows client installer, this occurs as part of the installation process. However, by using ClickOnce deployment, this cannot occur as part of the installation process, and it must therefore occur before the ClickOnce process is started.
If you decide to deploy the Microsoft Dynamics NAV Windows client using ClickOnce, then it is your responsibility that end users accept the Microsoft software license terms before the installation. We recommend that you also require end user acceptance of your software license terms and any third-party software license terms that are part of the ClickOnce deployment.
To help you with this process, you can use the NAVClientInstallation.html template web page that was installed as part of the ClickOnce Installer Tools. When you try to open that file, you must select the Accept check boxes before you can install the Microsoft Dynamics NAV Windows client. You can design your own web page, as long as the process for the end user is the same. The end user cannot install the Microsoft Dynamics NAV Windows client until he has accepted the software license terms.
Upgrading to a New Version of the Microsoft Dynamics NAV Client
If you want to push a new version of the Microsoft Dynamics NAV Windows client out to end users, you must do the following:
-
Produce a new ApplicationFiles folder. Follow the process that you used to create the first version, but assign a larger version number to the application manifest. You can replace the old application files in \\fileshare\clickonce\Deployment\ApplicationFiles, or you can put the new files in a new directory, such as \\fileshare\clickonce\Deployment\ApplicationFiles2. Make sure to run
mage.exe -updateto update the application manifest's file list and hash values. Runmage.exe -signto sign the application manifest. -
Run
mage.exe -updateto update the deployment manifest's reference to the application manifest as well as its hash value. Update the deployment manifest's version number. Runmage.exe -signto sign the deployment manifest.
The upgrade check is based on the deployment manifest’s version. This is the version of the Microsoft Dynamics NAV Windows client that will be installed if a user installs Microsoft Dynamics NAV for the first time. The deployment manifest also contains a minimumRequiredVersion. If a previously installed Microsoft Dynamics NAV Windows client has a version that is less than minimumRequiredVersion, then the user is forced to upgrade the Microsoft Dynamics NAV Windows client. This will appear similar to the following.
| Copy Code | |
|---|---|
<assemblyIdentity name="Microsoft Dynamics NAV" version="7.0.0.0" … />
  <deployment install="true" minimumRequiredVersion="7.0.0.0">
    <subscription>
      <update>
        <beforeApplicationStartup />
      </update>
</subscription> | |
The <update> tag determines when the upgrade check is performed. In the example earlier in this section, beforeApplicationStartupwas specified, which means the upgrade check will be performed before the Microsoft Dynamics NAV Windows client starts and the user will experience a short delay every time that the Microsoft Dynamics NAV Windows client is started. If you want the upgrade check to be performed in the background every time that the Microsoft Dynamics NAV Windows client is started, then use the following setting.
| Copy Code | |
|---|---|
<update>
        <expiration maximumAge="0" unit="days" />
      </update>
| |
With this setting, the user will be able to run the Microsoft Dynamics NAV Windows client without any delay. In the background, ClickOnce will check if the current version is too low. ClickOnce will enforce the upgrade the next time that the Microsoft Dynamics NAV Windows client starts. If you want to check for updates, such as every 14 days, then add maximumAge=”14”.
The application manifest version number can be changed independently of the deployment manifest version number. If you change the version number in the deployment manifest, but keep referring to the same version of the application manifest, then the user will experience that the Microsoft Dynamics NAV Windows client is upgraded, but nothing will occur because the new version of the deployment manifest will still point to the same application version. For example, this can be useful if you want to change the frequency of the upgrade checks or change the text in the Start menu.
Security Considerations
Installing any application on the local computer requires that you consider whether it is safe to do this. For a ClickOnce deployment of the Microsoft Dynamics NAV Windows client, here are some recommended security measures that you should consider:
- Internal deployment - If you host the ClickOnce deployment on an internal file share or website, we recommend that you sign the ClickOnce deployment so that end users will not see an Unknown publisher message during installation. However, it is also acceptable not to sign the ClickOnce deployment.
- Public deployment - If you host the ClickOnce deployment in a public location, we recommend that you sign the ClickOnce deployment and host it on a secure website (https://). Taking these precautions will reduce the risk of end users installing applications from bad sources and locations.
Limitations of ClickOnce Installed on the Microsoft Dynamics NAV Windows Client
The following are limitations of ClickOnce installed on the Microsoft Dynamics NAV Windows client.
Command-line arguments - ClickOnce installed on the Microsoft Dynamics NAV client cannot be run with custom command-line arguments. For example, this affects the following scenarios:
-
An end user cannot specify the Home page.
-
An end user cannot specify a profile. He can only use his default profile.
-
An end user cannot disable personalization. An administrator can disable personalization on a profile.
-
An administrator cannot configure profiles. He should use the MSI-installed client for this task.
-
An end user cannot run in full-screen mode.
-
An end user cannot disable the navigation pane.
Hyperlinks - The protocol handler dynamicsnav:// is not registered during ClickOnce installation, which means that the Microsoft Dynamics NAV client cannot be activated by choosing a hyperlink. This could impact the following scenarios:
-
End users cannot send each other links to specific pages.
-
An end user cannot use the link on a OneNote page.
-
An end user cannot use the link on a report.
-
The debugger cannot be started.
External components calling the Microsoft Dynamics NAV Windows client - A ClickOnce-installed Microsoft Dynamics NAV Windows client will be installed in a randomly generated folder, and when it is upgraded to a new version, it will be installed a new randomly generated folder. This means that external components will not be able to detect where the Microsoft Dynamics NAV Windows client executable is located. This could impact the following scenarios:
-
An end user can send a list page to Excel, but cannot refresh data from the Excel application.
-
Third-party applications cannot start the Microsoft Dynamics NAV Windows client.